Updated for 2026. Reflective tape is only as good as its application. Even the brightest, most expensive tape will fail if it’s not applied correctly. This guide covers everything you need to know to get a clean, long-lasting bond — from surface preparation to application technique to the mistakes that cause tape to peel, bubble, or fall off.
Step 1: Surface Preparation
Surface prep is the single most important factor in how long your reflective tape will last. Skip this step and you’re wasting your time and money.
Clean the surface thoroughly. Wipe the application area with isopropyl alcohol (IPA) at 50% concentration or higher. Do NOT use household cleaners, Windex, or soap and water — these leave residues that prevent adhesion. For heavily soiled or greasy surfaces (like truck bumpers or industrial equipment), clean first with a degreaser, then follow up with IPA as a final wipe.
Dry completely. Moisture trapped under the tape will cause it to fail. After cleaning, let the surface air dry for several minutes. In humid conditions, wipe dry with a clean lint-free cloth.
Check the surface condition. Reflective tape adheres best to smooth, non-porous surfaces. Rust, flaking paint, powder coat in poor condition, and heavily textured surfaces will reduce adhesion. Sand or scrape away loose material before applying. On bare metal, a light scuff with fine sandpaper (220 grit) can improve the mechanical bond.
Step 2: Temperature Matters
Most reflective tape adhesives require a minimum application temperature of 50°F (10°C). Below this temperature, the adhesive becomes stiff and won’t bond properly — even if it seems to stick initially, it will likely peel within days or weeks.
If you must apply tape in cold conditions, warm the surface and the tape with a heat gun or hair dryer before application. Bring the tape indoors for at least an hour before use so it reaches room temperature. Some professional applicators keep tape rolls in their heated truck cab during winter jobs.
Ideal application temperature is between 60°F and 90°F (15°C to 32°C). In extreme heat above 100°F, the adhesive may become overly aggressive and difficult to reposition.
Step 3: Application Technique
Peel and position. Peel back a few inches of the release liner (backing paper) and position the tape where you want it. Do NOT peel the entire liner off at once — the tape will curl, stick to itself, and become difficult to handle.
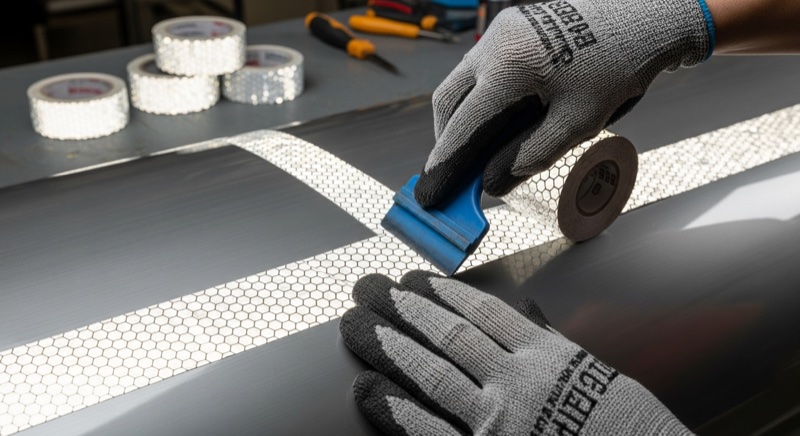
Apply with pressure. Once positioned, press the tape firmly with a squeegee, roller, or the edge of a credit card. Apply pressure from the center outward to push air bubbles to the edges. For best results, use a hard rubber roller and apply firm, even pressure across the entire surface.
Work in sections. For long runs of tape (like DOT conspicuity marking on trailers), apply 12-18 inches at a time. Peel, position, press, then peel the next section. This prevents the tape from stretching or misaligning.
Overlap joints by ½ inch. When joining two pieces of tape end-to-end, overlap by at least half an inch. Butt joints (where two pieces meet edge-to-edge with no overlap) will separate over time as the tape expands and contracts with temperature changes.
Curved and Irregular Surfaces
Not all reflective tapes handle curves equally. For curved surfaces like bollards, poles, helmets, and vehicle contours, you need a conformable tape — one that stretches and molds to the shape without lifting at the edges.
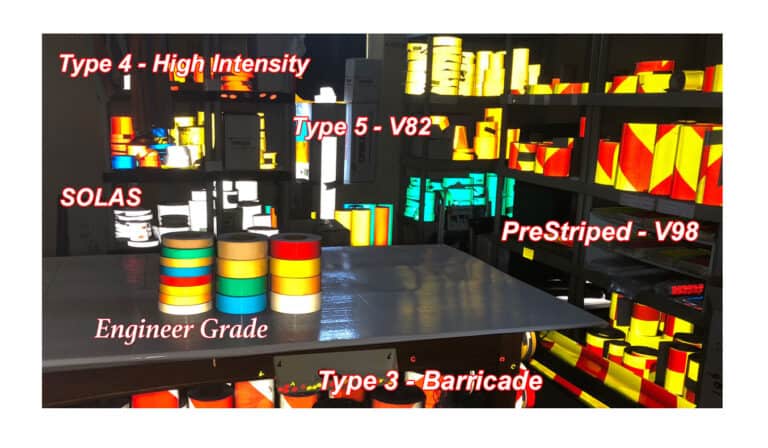
Best tapes for curves:
- Flexible Engineer Grade (Nikkalite EG, Oralite 5650 Rapid Air) — very conformable, stretches easily
- Oralite V98 Conformable Prismatic — high-brightness prismatic tape specifically designed for curved surfaces
- Flexible High Intensity (Nikkalite Type 3) — stretchable and reboundable, good for surfaces that flex
Tapes to avoid on tight curves: Rigid prismatic films like standard high intensity (Type 4) and diamond grade tapes do not conform well. They will bridge across curves, creating air channels underneath that lead to edge lifting and premature failure.
When applying to curves, use a heat gun to gently warm the tape as you apply it. The heat softens the film and adhesive, allowing it to stretch and conform more easily. Don’t overheat — just warm enough that the tape becomes pliable.
When to Use a Primer
Most reflective tapes have pressure-sensitive adhesive that bonds well to clean, smooth surfaces without a primer. However, a primer is recommended for:
- Low surface energy plastics (polyethylene, polypropylene) — tape won’t stick well without a primer
- Powder-coated surfaces — some powder coats have surface energy too low for direct bonding
- Textured or porous surfaces — primer fills micro-gaps and creates a bondable surface
- Extreme temperature applications — primer adds an extra layer of adhesion insurance
3M Primer 94 and VHB Surface Prep are two commonly used products for smooth surfaces. Apply a thin coat, let it dry until tacky (usually 5-10 minutes), then apply the tape.
DAP Contact Cement is another excellent option, especially for wood surfaces, concrete, and pitted or uneven surfaces where a thicker primer is needed. Unlike thin liquid primers, contact cement fills in gaps, grain, and imperfections to create a smooth, bondable surface. Apply a coat of DAP Contact Cement to the surface, let it dry completely until it is no longer tacky to the touch, then apply the reflective tape on top with firm pressure. The dried contact cement acts as both a filler and an adhesion promoter — the tape’s pressure-sensitive adhesive bonds extremely well to the cured contact cement layer. This technique is particularly useful for wooden signs, fence posts, rough-sawn lumber, textured concrete bollards, and any surface with pits or irregularities that would prevent full tape contact.
Cure Time
Reflective tape adhesive reaches approximately 50% of its ultimate bond strength within 20 minutes of application, but full cure takes 24-72 hours. During this period:
- Avoid washing or pressure-washing the taped area
- Don’t expose to rain if possible (especially in the first few hours)
- Avoid extreme temperatures
- Don’t peel and reposition — once pressed, the bond has started
Common Mistakes to Avoid
- Dirty surface: The #1 cause of tape failure. Always clean with IPA first.
- Cold application: Applying below 50°F without warming the surface. The tape may seem to stick but will peel within weeks.
- Stretching the tape: Pulling tape tight during application causes it to want to spring back to its original length, which lifts edges over time. Apply with zero tension.
- Not enough pressure: Simply laying tape on a surface isn’t enough. You must press firmly with a squeegee or roller to activate the adhesive bond.
- Wrong tape for the surface: Using rigid prismatic tape on a curved bollard, or standard outdoor tape in a marine environment. Match the tape to the application.
- Touching the adhesive: Oils from your fingers contaminate the adhesive. Handle tape by the edges or wear clean gloves.
- Applying over existing tape: Always remove old tape completely and clean the surface before applying new tape. Layering tape over old tape creates weak bonds.
Summary
The key to a successful reflective tape application comes down to three things: clean surface, proper temperature, and firm pressure. Get these three right and your tape will perform to its full rated lifespan. Skip any one of them and you’ll be reapplying sooner than you’d like.
For help choosing the right tape for your specific surface and application, use our AI assistant or browse our full selection at tapefinder.com.
![]()
Steven Cole (Economics, MBA – University of West Florida , Business & Innovation – Stanford University) 25 years of experience in the reflective safety business. Specializing in vehicle accident and rear end collision reduction through increased visibility.